
Choco-Banana Bliss Pops: A Sweet and Nutritious Frozen Treat
In the world of frozen treats, few combinations are as delightful as chocolate and bananas. The Choco-Banana Bliss Pops not only satisfy your sweet tooth but also offer a nutritious twist, making them a perfect snack for both kids and adults. This recipe is simple and fun to make, allowing for customization with various toppings to suit every palate. Join us as we delve into the details of crafting these delicious pops, exploring their ingredients, preparation steps, and the joy they bring to any occasion.
Understanding Choco-Banana Bliss Pops
Exploring the Appeal of Chocolate and Bananas
The irresistible combination of chocolate and bananas has captivated taste buds for generations. This pairing is beloved not only for its sweet, creamy flavor but also for its versatility. Whether enjoyed in a smoothie, dessert, or snack, chocolate and bananas create a harmonious balance that appeals to all age groups. The rich, indulgent taste of chocolate complements the natural sweetness and soft texture of bananas, resulting in a treat that’s both comforting and satisfying.
From classic banana splits to decadent chocolate-covered bananas, this duo has found its way into countless recipes, and for good reason. The flavor profiles of chocolate and bananas work together beautifully, producing a taste experience that is both familiar and exciting. Additionally, this combination is perfect for experimenting with varying levels of sweetness, allowing each individual to create their ideal version of Choco-Banana Bliss Pops.
Nutritional Benefits of Bananas
Bananas are not just a delicious fruit; they are also a powerhouse of nutrition. Rich in potassium, fiber, and vitamins, bananas make a healthy addition to any diet. Potassium is essential for maintaining proper heart function and regulating blood pressure, while dietary fiber promotes healthy digestion and can aid in weight management.
Moreover, bananas are an excellent source of energy, making them a perfect pre or post-workout snack. Their natural sugars provide a quick energy boost, while the fiber content ensures a steady release of energy over time. By incorporating bananas into your snacks, you can enjoy a tasty treat that also contributes to your overall health and well-being.
The Joy of Chocolate
Chocolate, particularly dark chocolate, is often celebrated for its rich flavor and various health benefits. Dark chocolate is packed with antioxidants, which can help combat oxidative stress in the body. In addition to its antioxidant properties, dark chocolate has been linked to mood-enhancing effects, making it a delightful indulgence when you need a little pick-me-up.
While dark chocolate is often touted as the healthier option, milk chocolate is another delicious choice for those who prefer a sweeter taste. Each type of chocolate imparts a unique flavor profile to the Choco-Banana Bliss Pops, allowing you to tailor the recipe to your preferences. Whether you opt for the deep, complex flavors of dark chocolate or the creamy sweetness of milk chocolate, both variations will satisfy your cravings and elevate your snacking experience.
Ingredients Breakdown
Essential Ingredients for Choco-Banana Bliss Pops
Crafting the perfect Choco-Banana Bliss Pops starts with selecting the right ingredients. Here, we’ll take a closer look at the key components of this recipe, focusing on their roles and benefits.
1. Bananas: The Star Ingredient
Bananas are the heart of Choco-Banana Bliss Pops. When selecting bananas for this recipe, it’s important to choose ripe ones that have developed a natural sweetness. Ripe bananas not only provide the ideal texture for freezing but also lend a beautiful creaminess to the pops. As the bananas freeze, they become even sweeter, creating a deliciously satisfying treat.
2. Chocolate Choices: Dark vs. Milk
The type of chocolate you choose can significantly impact the flavor and nutrition of your pops. Dark chocolate is rich in antioxidants and has a more intense flavor, while milk chocolate offers a sweeter, creamier experience. Each option brings its unique attributes to the recipe, allowing you to customize your pops based on your taste preferences and dietary goals.
3. Optional Ingredients: Coconut Oil, Nuts, and Shredded Coconut
To enhance the flavor and texture of your Choco-Banana Bliss Pops, consider incorporating optional ingredients such as coconut oil, nuts, and shredded coconut. Coconut oil can help the chocolate adhere better to the bananas and add an extra layer of richness. Nuts, whether chopped or whole, provide a satisfying crunch and a dose of healthy fats, while shredded coconut adds a tropical flair and additional sweetness. These optional ingredients can be mixed and matched to create a variety of flavor profiles, ensuring that everyone can enjoy their ideal version of Choco-Banana Bliss Pops.
Step-by-Step Instructions
Now that we’ve explored the delightful combination of chocolate and bananas, their nutritional benefits, and the key ingredients for our Choco-Banana Bliss Pops, it’s time to embark on the fun and straightforward process of creating these frozen treats.
1. Gather Your Ingredients: Start by assembling all the necessary ingredients. You will need ripe bananas, your choice of chocolate (dark or milk), and any optional ingredients you wish to include.
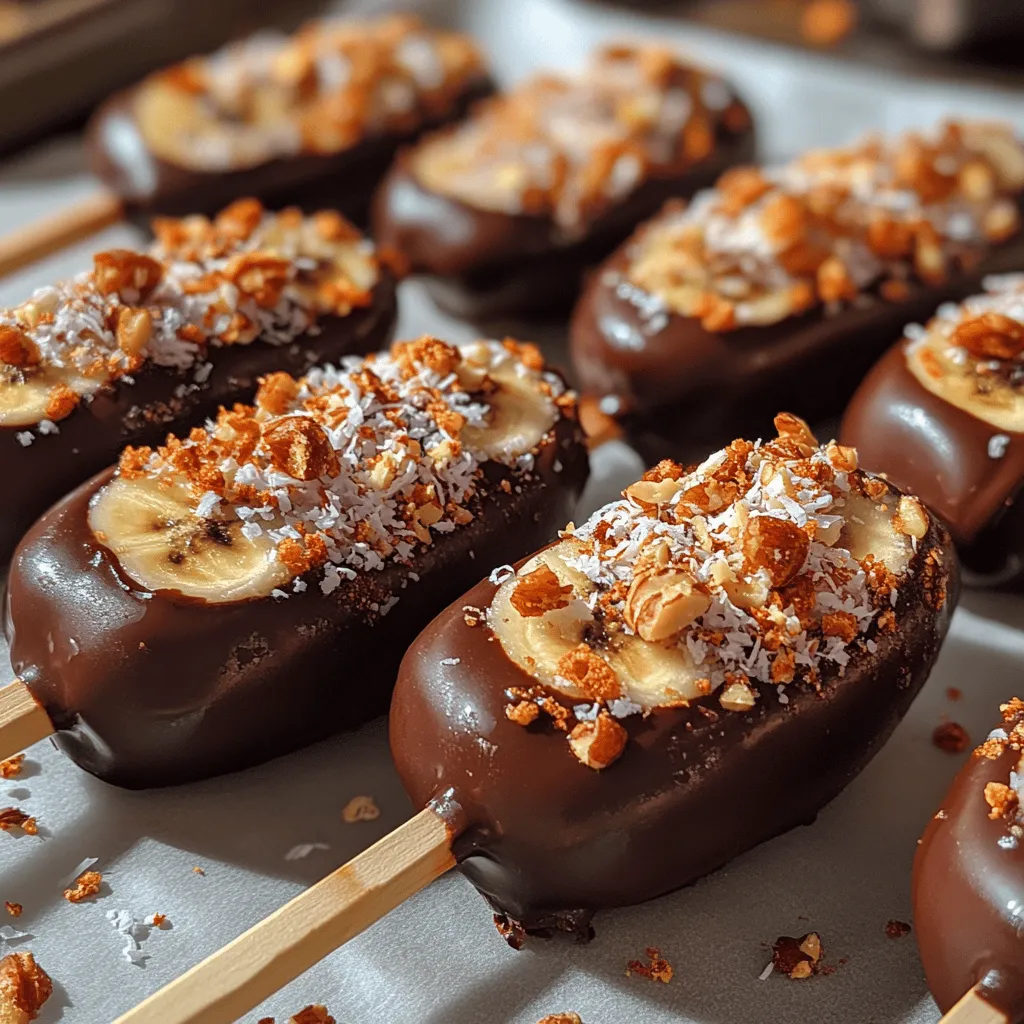
2. Prepare the Bananas: Peel the bananas and cut them into equal-sized chunks or halves, depending on your preference for pop size. If you prefer pops on sticks, cut the bananas into halves and insert a wooden stick into each half.
3. Melt the Chocolate: In a microwave-safe bowl, melt the chocolate gently in 30-second intervals, stirring between each interval until smooth and fully melted. If you’re using coconut oil, you can add a teaspoon to the chocolate to enhance its consistency.
4. Dip the Bananas: Once the chocolate is melted, dip each banana piece into the chocolate, ensuring they are completely coated. Allow any excess chocolate to drip off before moving to the next step.
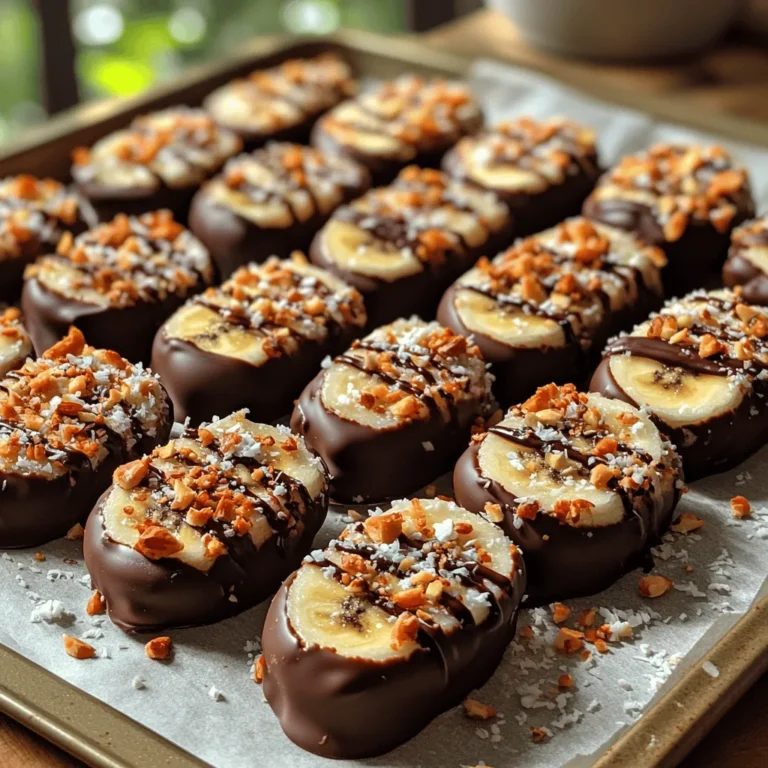
5. Add Toppings: If you’re using optional ingredients like chopped nuts or shredded coconut, sprinkle them over the chocolate-coated bananas before the chocolate sets. This step adds an exciting texture and flavor to your pops.
6. Freeze the Pops: Place the chocolate-covered bananas on a parchment-lined baking sheet. Make sure they are not touching each other to prevent sticking. Transfer the baking sheet to the freezer and let the pops freeze for at least 2 hours or until firm.
With these initial steps, you’re well on your way to enjoying your homemade Choco-Banana Bliss Pops. Stay tuned as we continue to explore variations, storage tips, and creative serving ideas in the next part of this delicious journey!
In the world of frozen treats, Choco-Banana Bliss Pops stand out as a delightful combination of creamy bananas and rich chocolate. These pops not only satisfy your sweet tooth but also provide a healthier alternative to traditional desserts. Let’s dive into the preparation and enjoy this delicious recipe.
Preparing the Bananas
Before you can indulge in your Choco-Banana Bliss Pops, you need to prepare the bananas. Start with ripe bananas, as they are sweeter and creamier. Here’s how to prepare them properly for freezing:
1. Peeling the Bananas: Begin by peeling each banana carefully. It’s important to handle them gently to avoid bruising.
2. Cutting the Bananas: Slice each banana into 1-inch thick pieces. If you prefer pops, you can leave them whole, but cutting them into bite-sized pieces makes them easier to handle and freeze.
3. Inserting Sticks: For pops, insert wooden sticks into the center of each banana piece, pushing them in about halfway. If you’re using whole bananas, simply insert one stick into the end of each banana.
4. Placing on a Baking Sheet: Line a baking sheet with parchment paper. Arrange the banana pieces or whole bananas on the sheet, ensuring they are spaced apart. This prevents them from sticking together during freezing.
Freezing Process
Freezing the bananas properly is essential for achieving the right texture and ease of coating.
1. Initial Freezing: Place the baking sheet with the bananas in the freezer for about 1-2 hours. This allows the bananas to freeze thoroughly, creating a solid base for coating later.
2. Spacing: Ensure there is enough space between each banana piece, allowing air to circulate. This helps them freeze evenly and prevents sticking.
3. Checking for Full Freezing: After the initial freezing time, check if the bananas are firm to the touch. They should feel solid and not mushy. If they still feel soft, give them an additional 30 minutes in the freezer.
Melting the Chocolate
Achieving the perfect chocolate consistency is crucial for creating a smooth and delicious coating. Here’s how to do it:
1. Choosing the Chocolate: Select high-quality chocolate chips or chocolate bars. Dark chocolate, milk chocolate, or even white chocolate can be used depending on your preference.
2. Microwave Technique: Place your chocolate in a microwave-safe bowl. Microwave on medium power in 30-second intervals, stirring in between, until the chocolate is almost melted. This gentle heating helps prevent scorching.
3. Adding Coconut Oil: To achieve a smoother consistency and glossy finish, add a teaspoon of coconut oil to the melted chocolate. This not only enhances the texture but also helps the chocolate coat the bananas evenly.
4. Final Stirring: Once the chocolate is fully melted and smooth, give it a final stir to ensure the coconut oil is well incorporated.
Coating the Banana Pops
Now, it’s time to coat your frozen bananas with the luscious chocolate. Follow these step-by-step instructions for a flawless coating:
1. Prepare for Coating: Remove the frozen bananas from the freezer. Set up a clean workspace where you can dip the bananas in chocolate.
2. Dipping in Chocolate: Hold each banana by the stick and dip it into the melted chocolate. Ensure it is fully coated, allowing any excess chocolate to drip off.
3. Return to Baking Sheet: Place the coated banana back on the parchment-lined baking sheet. Repeat the process for all banana pieces.
4. Setting the Chocolate: Allow the chocolate to set slightly at room temperature for about 5-10 minutes. This helps create a sturdy coating before adding toppings.
Adding Toppings
Toppings can elevate your Choco-Banana Bliss Pops to a whole new level. Here are some creative ideas:
1. Nuts and Coconut: While the chocolate is still wet, sprinkle chopped nuts (like almonds or walnuts) or shredded coconut over the pops. These add a delightful crunch and flavor.
2. Sprinkles: For a fun and colorful touch, add sprinkles or edible glitter on top of the chocolate before it sets. This is especially great for kids’ parties!
3. Seeds: Try adding chia seeds or hemp seeds for a nutritious boost. They add texture and a bit of health benefits to your treats.
4. Variety of Toppings: Other great toppings include crushed cookies, granola, or even a drizzle of caramel or peanut butter for extra indulgence.
Final Freezing and Serving
To ensure your Choco-Banana Bliss Pops are ready for enjoyment, follow these final steps:
1. Final Freeze: After adding your desired toppings, return the baking sheet to the freezer for at least another hour. This allows the chocolate to harden completely.
2. Serving: Once set, remove the pops from the freezer. For easy serving, you can cut the parchment paper into individual squares, making it simple to grab and enjoy.
Enjoying Choco-Banana Bliss Pops
Serving Suggestions
There are countless ways to present your Choco-Banana Bliss Pops:
– Simple Serving: Serve them directly on the sticks as a quick snack. They are perfect for hot summer days or an afternoon treat.
– Party Presentation: For gatherings, arrange the pops in a decorative jar or stand. You can also place them on a serving platter with a colorful fruit salad.
– Dessert Table: Include them as part of a dessert table with other treats. They add a healthy option alongside traditional desserts.
– Dipped in Sauce: Consider serving your pops with a side of melted chocolate or fruit sauce for dipping, enhancing the flavor experience.
Storing Your Pops
To keep your Choco-Banana Bliss Pops fresh and delicious:
1. Proper Storage: Place the pops in an airtight container, separating layers with parchment paper to prevent sticking.
2. Freezing: Store the container in the freezer. They can last up to 1-2 months, but they are best enjoyed within the first few weeks for optimal flavor and texture.
3. Thawing: When ready to eat, simply remove the desired number of pops from the freezer and let them sit at room temperature for a few minutes before enjoying. This helps soften the chocolate slightly for easier biting.
Conclusion
Choco-Banana Bliss Pops are not just a treat; they are a celebration of simple, wholesome ingredients coming together to create something truly delicious. This recipe showcases the beauty of combining health and indulgence, making it a perfect addition to your dessert repertoire. Whether enjoyed as an afternoon snack, a party treat, or a healthy dessert option, these bliss pops are sure to impress. Embrace your creativity by experimenting with different toppings and chocolate types, and savor the joy of making something special from your kitchen. Enjoy every bite of this delightful recipe!
