
Introduction
Indulging in a delightful dessert doesn’t have to mean compromising on simplicity or flavor. Enter the Berry Bliss Cheesecake Cups, a delectable treat that combines the richness of cheesecake with the fresh taste of mixed berries. Perfect for gatherings, special occasions, or as a sweet ending to a weeknight meal, these individual cups offer a perfect balance of creamy texture and fruity goodness. Not only are they visually appealing, but they also provide a satisfying and refreshing way to enjoy cheesecake without the fuss of a traditional slice. The individual servings make them easy to serve and even easier to enjoy, allowing guests to savor their own little portion of bliss.
In this article, we will delve into the step-by-step process of creating these delightful cheesecake cups, while also discussing the essential ingredients, their nutritional benefits, and tips for achieving the best results. Whether you’re a seasoned baker or a novice in the kitchen, this recipe is designed to be straightforward and approachable, ensuring you can whip up a batch of these indulgent treats with confidence.
Understanding the Ingredients
To create the Berry Bliss Cheesecake Cups, understanding the role of each ingredient is crucial. This not only helps in achieving the best flavor and texture but also allows for substitutions if needed. Let’s break down the core components of this delicious recipe.
The Base: Graham Crackers
The foundation of any great cheesecake is its crust, and for our Berry Bliss Cheesecake Cups, crushed graham crackers are the star. Graham crackers impart a subtle sweetness and a slight nuttiness that perfectly complements the rich filling. When crushed and combined with melted butter and sugar, they create a flavorful and crunchy base that holds the creamy cheesecake filling in place. The butter helps bind the crumbs together, while the sugar enhances the overall taste, making every bite a perfect blend of flavors.
To achieve an ideal graham cracker crust, it’s important to ensure the crumbs are finely ground. This not only helps in creating a uniform texture but also ensures that the crust holds together well when served. A food processor makes quick work of this task, but if you don’t have one, placing the crackers in a zip-top bag and crushing them with a rolling pin works just as effectively.
The Creamy Filling: Cream Cheese and Whipped Cream
The filling of our cheesecake cups is where the magic truly happens. Cream cheese is the primary ingredient, providing that signature rich and creamy texture that cheesecake lovers adore. It’s essential to use softened cream cheese for this recipe; this ensures that it blends smoothly with the other ingredients, avoiding any lumps.
In addition to cream cheese, heavy whipping cream is incorporated to give the cheesecake a light and airy quality. Whipping the cream adds volume and creates a luscious mouthfeel, which balances the density of the cream cheese. The combination of these two ingredients results in a cheesecake filling that is both indulgent and surprisingly light, making it perfect for warm weather or when you want a dessert that feels less heavy.
The Sweetness Factor: Sugars and Flavorings
When it comes to sweetness, the recipe calls for both granulated sugar and powdered sugar. Granulated sugar is typically used for the initial mixing with the cream cheese, providing a straightforward sweetness, while powdered sugar is often used for the whipped cream. The fine texture of powdered sugar allows it to dissolve quickly, ensuring that the whipped cream remains fluffy and light.
Adding a splash of vanilla extract enhances the overall flavor profile of the cheesecake cups. It adds warmth and depth, beautifully complementing the sweetness of the sugars and the tangy richness of the cream cheese. Opting for pure vanilla extract over artificial vanilla will elevate the flavor even further, making each bite truly memorable.
The Stars of the Show: Mixed Berries
No cheesecake is complete without its crowning glory: the berries. For this recipe, a medley of mixed berries—blueberries, raspberries, and strawberries—takes center stage. Not only do these fruits add vibrant color and visual appeal, but they also contribute a burst of fresh flavor that balances the creaminess of the cheesecake.
From a nutritional standpoint, berries are a powerhouse of vitamins, antioxidants, and fiber. Blueberries are particularly known for their high antioxidant content, while strawberries and raspberries provide a good dose of vitamin C and dietary fiber. Importantly, using frozen berries can be just as flavorful as fresh ones, making them an accessible option year-round. When using frozen berries, they should be thawed and drained to prevent excess moisture from affecting the cheesecake mixture.
Step-by-Step Instructions for Berry Bliss Cheesecake Cups
Now that we’ve covered the essential ingredients, let’s dive into the initial steps of creating the Berry Bliss Cheesecake Cups.
Preparing the Graham Cracker Crust
To kick off the process, start by preparing the graham cracker crust. In a mixing bowl, combine 1 and ½ cups of finely crushed graham crackers with ¼ cup of granulated sugar and ½ cup of melted butter. The mixture should resemble wet sand, allowing it to easily mold when pressed into the bottom of your serving cups.
For optimal results, use a measuring cup or the back of a spoon to firmly pack the graham cracker mixture into the bottom of each cup. This step is crucial, as a well-formed crust will provide a solid base for the cheesecake filling. Once you’ve pressed the mixture down evenly, place the cups in the refrigerator for about 15-20 minutes to allow the crust to set up. This chilling period helps the butter harden slightly, ensuring the crust remains intact when filled.
Creating the Cheesecake Mixture
While the crust is chilling, you can prepare the cheesecake filling. Start by taking 8 ounces of softened cream cheese and placing it in a mixing bowl. Beat it with an electric mixer on medium speed until it’s creamy and smooth, which should take about 2-3 minutes.
Next, gradually add in ½ cup of granulated sugar, continuing to mix until well combined. It’s important to scrape down the sides of the bowl occasionally to ensure all the cream cheese is incorporated. Once the sugar is mixed in, add 1 teaspoon of vanilla extract to enhance the flavor.
In a separate bowl, take 1 cup of heavy whipping cream and begin whipping it with an electric mixer until stiff peaks form. This means the cream should be thick enough to hold its shape when you lift the beaters out of the bowl. Once the whipped cream is ready, gently fold it into the cream cheese mixture. This technique ensures that the filling remains light and airy, giving the cheesecake cups their delightful texture. Be cautious not to overmix, as you want to maintain the volume of the whipped cream.
Whipping the Cream to Perfection
The final touch to our cheesecake filling involves the whipped cream. As mentioned, achieving stiff peaks is key to a perfect cheesecake texture. When whipping the cream, start at a lower speed to avoid splattering, gradually increasing to medium-high speed as the cream thickens. It’s also advisable to use a chilled bowl and beaters, which helps the cream whip more efficiently.
Once the whipped cream reaches the stiff-peak stage, gently fold it into the cream cheese and sugar mixture. Use a spatula to carefully combine the two, making sure not to deflate the whipped cream. The goal is to create a smooth, airy filling that will complement the crust beautifully.
With the crust ready and the filling prepared, you are well on your way to assembling the Berry Bliss Cheesecake Cups, setting the stage for a delightful dessert experience that will surely impress your guests. Stay tuned for the next part where we will discuss the final assembly and presentation of these heavenly treats.
Understanding the Importance of Stiff Peaks in Whipped Cream
When it comes to creating the perfect Berry Bliss Cheesecake Cups, achieving the right texture in your whipped cream is crucial. Stiff peaks are essential as they provide the structure needed to hold your cheesecake mixture together while adding a light and airy texture. To achieve stiff peaks, whip your heavy cream on medium-high speed until it thickens and forms peaks that stand upright without collapsing. This process incorporates air into the cream, creating a fluffy consistency that complements the richness of the cheesecake filling.
To ensure success, start with chilled heavy cream and a clean mixing bowl. This will help the cream whip up faster and achieve the desired peaks more easily.
Tips for Folding Whipped Cream Without Deflating It
Folding whipped cream into your cheesecake mixture is an art that requires a gentle touch. Here are some tips to help you fold without deflating your whipped cream:
1. Use a Rubber Spatula: A rubber spatula is perfect for folding because its flat edge can scrape the sides of the bowl and gently combine ingredients without breaking down the air bubbles in the whipped cream.
2. Add a Little at a Time: Start by adding a small portion of the whipped cream to the cheesecake mixture. This lightens the density of the filling and makes it easier to incorporate the rest without deflating.
3. Use a Gentle Folding Motion: Rather than stirring vigorously, use a folding motion—gently lift the mixture from the bottom and fold it over the top. Rotate the bowl as you go to ensure even mixing.
4. Don’t Overmix: The goal is to combine the whipped cream and cheesecake filling until you see no streaks. Overmixing can lead to a dense texture, so stop as soon as everything is well combined.
By mastering the folding technique, your cheesecake cups will maintain a light and fluffy consistency that melts in your mouth.
Layering the Cheesecake Cups
Guidelines for Portioning the Crust and Cheesecake Filling
Creating visually appealing cheesecake cups starts with proper layering. Here are guidelines for portioning:
– Crust Layer: For a balanced flavor and texture, distribute about 2 tablespoons of the graham cracker crust mixture at the bottom of each cup. Use the back of a spoon or a small measuring cup to press it down firmly, ensuring it’s compact but not overly dense.
– Cheesecake Layer: Add approximately 3 tablespoons of the cheesecake filling on top of the crust. This layer should be slightly heaped but not overflowing. Use a spatula to smooth the top for an elegant finish.
How to Evenly Distribute the Berry Mixture on Top
Once your crust and cheesecake layers are in place, it’s time to crown your cups with the berry mixture. Here’s how to do it evenly:
1. Spoon Technique: Use a small spoon to carefully scoop about 1 tablespoon of the mixed berry compote onto the cheesecake layer of each cup.
2. Spread Gently: If desired, use the back of the spoon to gently spread the berry mixture to the edges of the cup, but be careful not to disturb the cheesecake layer beneath.
3. Layering Order: You can create multiple layers by repeating the process. If doing so, ensure that your layers remain balanced. Two layers of cheesecake and berry compote often work well.
By layering thoughtfully, you will create a stunning presentation that showcases the vibrant colors of the berries against the creamy cheesecake.
Freezing for the Perfect Texture
Importance of Chilling Time for the Best Results
Once your cheesecake cups are layered, they need to chill for at least 4 hours, or ideally overnight, in the freezer. This chilling time allows the flavors to meld and the cheesecake to set properly. A well-chilled cheesecake will slice more cleanly if served in traditional formats and will hold its shape beautifully when served in cups.
How Freezing Affects the Flavor and Texture of the Cheesecake Cups
Freezing the cheesecake mixture enhances the overall flavor profile. The cooling process makes the flavors more pronounced, allowing the sweetness of the berries to complement the cream cheese filling perfectly. Additionally, the texture of your cheesecake cups will become delightfully firm yet creamy, offering a satisfying contrast to the crumbly crust.
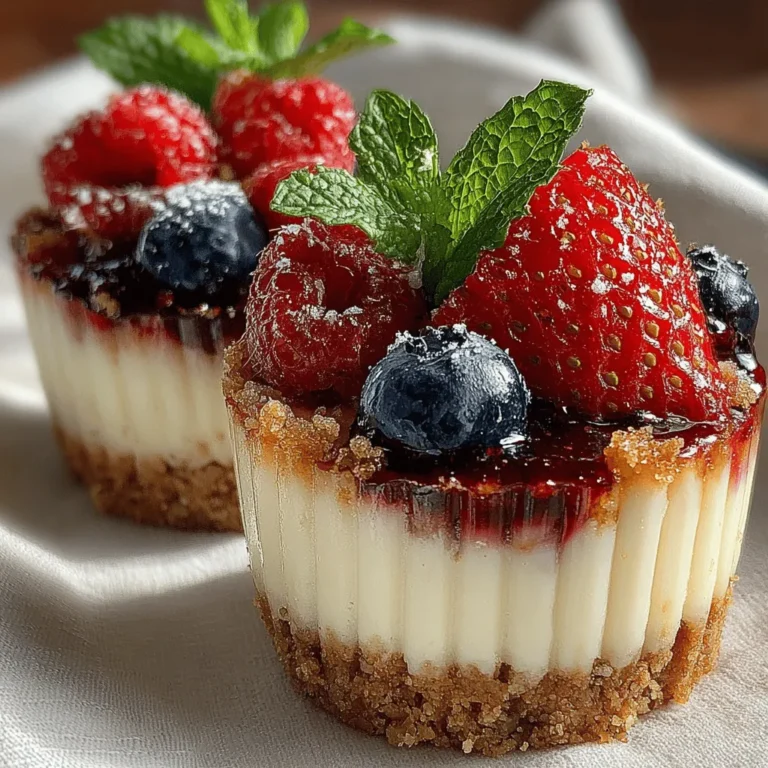
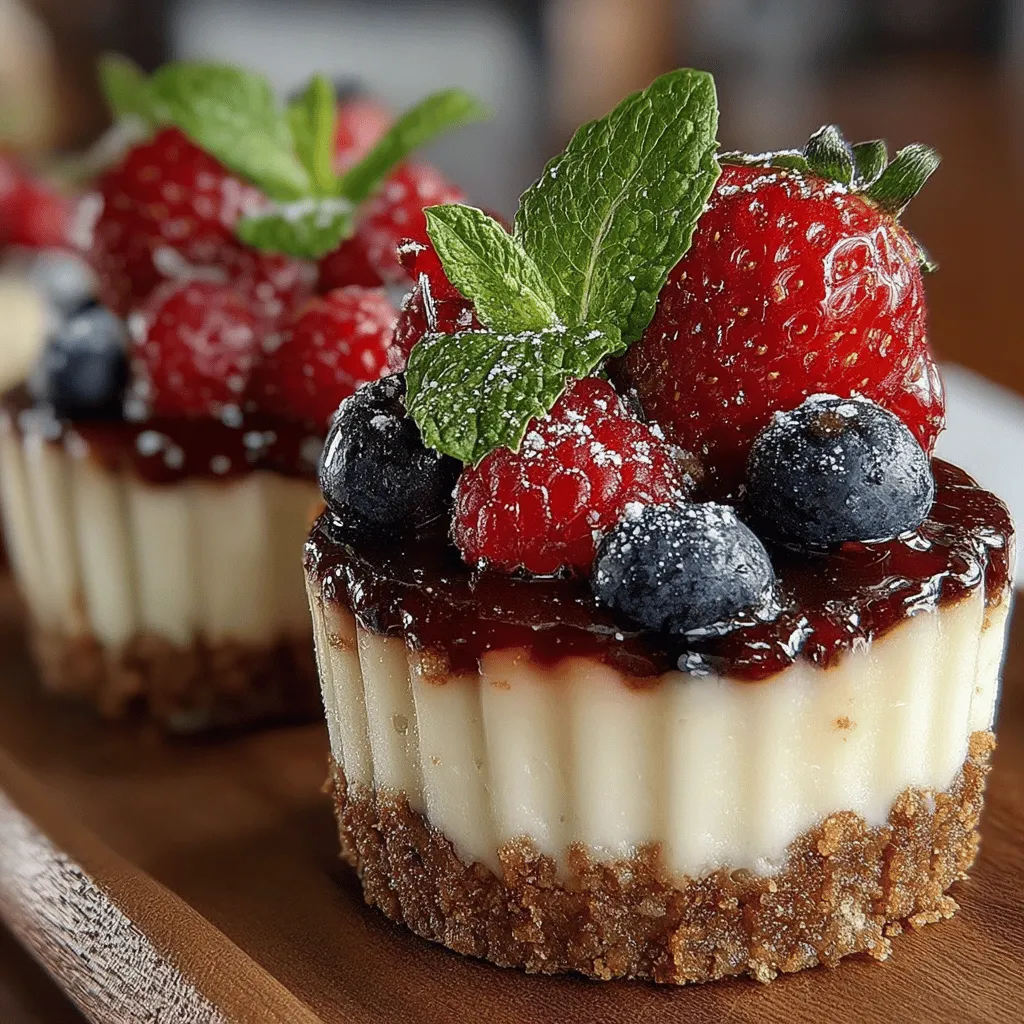
Presentation and Garnishing Ideas
Serving the Cheesecake Cups
Presentation is key when it comes to serving your Berry Bliss Cheesecake Cups. Here are some best practices:
1. Removing from the Freezer: When ready to serve, gently remove the cups from the freezer. If they are stuck, you can run the outside of the cup under warm water for a few seconds to loosen them.
2. Softening Before Serving: Let the cheesecake cups sit at room temperature for about 10-15 minutes before serving. This allows the filling to soften slightly, making for an easier bite and a creamier texture.
Creative Garnishing Techniques
Enhancing the appearance and flavor of your cheesecake cups can be achieved through creative garnishing:
– Fresh Berries: Top each cup with a few fresh berries, like strawberries or blueberries. These not only provide a pop of color but also add an extra burst of flavor.
– Mint Leaves: A small sprig of fresh mint adds a beautiful contrast against the vibrant berries and cheesecake. It also brings a refreshing aroma that enhances the dessert experience.
– Additional Toppings or Sauces: Consider drizzling a bit of berry sauce or chocolate ganache over the top just before serving. A sprinkle of crushed graham crackers can also add a delightful crunch.
Nutritional Insights
Caloric Breakdown of Berry Bliss Cheesecake Cups
Understanding the caloric content of your dessert can help you enjoy it mindfully. Here’s a breakdown of the primary ingredients in the Berry Bliss Cheesecake Cups:
– Cream Cheese: Provides a rich and creamy base, but also contributes to higher calories. A typical serving of cheesecake filling (about 1/4 cup) can range from 100-150 calories.
– Graham Crackers: The crust made from graham crackers adds some crunch and flavor. A standard serving of crust adds about 70-100 calories.
– Berries: Fresh berries are low in calories and packed with vitamins, making them an excellent addition. A serving of mixed berries (about 1/4 cup) adds roughly 20-30 calories.
Overall, a single Berry Bliss Cheesecake Cup can range from 250-350 calories, depending on portion sizes and specific ingredients used.
Balancing Indulgence with Health
Making indulgent desserts a bit healthier is achievable with simple modifications:
– Lower-Fat Cream Cheese: Opt for a lower-fat or reduced-calorie cream cheese to reduce the overall calorie count without sacrificing too much flavor.
– Alternative Sweeteners: Consider using natural sweeteners like honey or agave syrup in place of sugar to lower the glycemic index.
– Experiment with Nut Crusts: For a gluten-free option or added nutrients, substitute the graham cracker crust with ground nuts like almonds or walnuts mixed with a bit of coconut oil.
These substitutions can help you enjoy your dessert while keeping health considerations in mind.
Conclusion
Berry Bliss Cheesecake Cups offer an exquisite way to satisfy your sweet tooth while enjoying the fresh flavors of mixed berries. With a straightforward recipe and accessible ingredients, this dessert is not only a feast for the eyes but also a delightful treat for the taste buds. Perfect for any occasion, these cheesecake cups are sure to impress guests and make any meal feel special.
By following the outlined steps and understanding the role of each ingredient, you’ll be well on your way to creating a dessert that is both delicious and visually appealing. Enjoy the bliss of berries in every creamy bite!
