
Yogurt cups have surged in popularity in recent years, becoming a go-to snack for health enthusiasts and busy individuals alike. These portable, nutritious options provide an easy way to incorporate dairy and fruit into your diet, making them an ideal choice for breakfast, snacks, or even desserts. Among the myriad of yogurt cup variations, the Berry Bliss Yogurt Cups stand out as a vibrant, flavorful, and health-conscious option that brings together the goodness of mixed berries and creamy yogurt.
Introducing Berry Bliss Yogurt Cups
Berry Bliss Yogurt Cups combine the tangy richness of Greek yogurt with the natural sweetness of mixed frozen berries, creating a delightful treat that is as pleasing to the eye as it is to the palate. This recipe celebrates the exceptional health benefits of its ingredients while offering a versatile snack that can cater to various occasions. Whether you’re looking for a quick breakfast on a busy morning, a refreshing afternoon snack, or a light dessert to satisfy your sweet tooth, these yogurt cups fit the bill perfectly.
The beauty of Berry Bliss Yogurt Cups lies not only in their delectable flavor but also in their nutritional profile. Packed with antioxidants, vitamins, and minerals from the berries, combined with the gut-friendly probiotics and protein of Greek yogurt, this recipe promises a satisfying and nourishing experience. As we delve deeper into the recipe, you’ll discover how easy it is to prepare these cups, allowing you to enjoy a wholesome treat without the hassle of elaborate cooking.
Understanding the Benefits of Berry Bliss Yogurt Cups
Nutritional Value of Ingredients
The key to creating a truly healthy snack is in selecting quality ingredients. Berry Bliss Yogurt Cups feature a blend of mixed frozen berries, Greek yogurt, natural sweeteners, and optional toppings that enhance both flavor and nutrition.
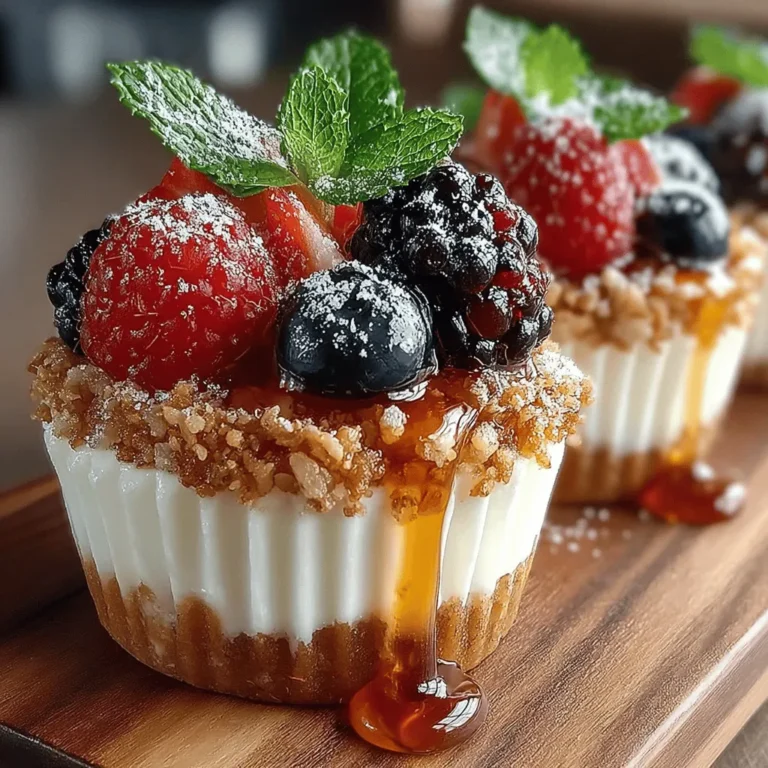
Mixed Frozen Berries: The star of this recipe, mixed frozen berries such as strawberries, blueberries, raspberries, and blackberries, offer a bounty of nutritional benefits. They are rich in antioxidants, which help combat oxidative stress in the body and may reduce the risk of chronic diseases. Additionally, these berries are loaded with essential vitamins such as vitamin C and K, as well as dietary fiber, which aids in digestion.
Greek Yogurt: Known for its thick and creamy texture, Greek yogurt is a protein powerhouse that supports muscle health and keeps you feeling full longer. It’s also an excellent source of probiotics, which are beneficial for gut health. When choosing Greek yogurt, you can opt for plain varieties to avoid added sugars or explore flavored options that complement the berry mixture.
Natural Sweeteners: In this recipe, you have the choice between honey and maple syrup as natural sweeteners. Both options provide a healthier alternative to refined sugars, infusing the yogurt cups with a touch of sweetness without overwhelming the natural flavors of the berries. Honey offers antimicrobial properties, while maple syrup is rich in minerals like manganese and zinc.
Importance of Using Natural Ingredients
One of the significant advantages of making your own Berry Bliss Yogurt Cups is the ability to control the ingredients. Unlike many store-bought yogurt cups that can be loaded with preservatives, artificial flavors, and excessive sugars, homemade versions ensure that you are consuming only the finest natural ingredients. This choice not only enhances the flavor and freshness of the treat but also allows you to avoid unwanted additives that can detract from your health goals.
Ingredients Breakdown
Before diving into the preparation steps, let’s take a closer look at each ingredient that makes up these delightful Berry Bliss Yogurt Cups.
1. Mixed Frozen Berries: When selecting mixed frozen berries, look for high-quality options that are free from added sugars or syrups. Each type of berry contributes unique flavors: strawberries provide sweetness, blueberries offer a mild tang, raspberries bring a hint of tartness, and blackberries add a rich depth.
2. Greek Yogurt: For the best texture and taste, choose plain Greek yogurt as your base. This option allows you to control the sweetness and flavor profile of your yogurt cups. If you prefer a hint of flavor, consider a vanilla or berry-flavored Greek yogurt, but be mindful of the sugar content.
3. Sweeteners: Honey and maple syrup both offer distinct flavors. Honey is more floral and sweet, while maple syrup adds a warm, earthy tone. You can adjust the quantity based on your preference for sweetness, but start with a small amount and taste as you go.
4. Granola and Nuts: For added crunch and nutritional benefits, consider topping your yogurt cups with granola or nuts. Granola can provide whole grains and fiber, while nuts add healthy fats and protein. Options like almonds, walnuts, or granola clusters can elevate the texture and make the treat even more satisfying.
5. Fresh Mint: A sprinkle of fresh mint leaves not only enhances the presentation but also adds a refreshing flavor that complements the sweetness of the berries.
Step-by-Step Guide to Making Berry Bliss Yogurt Cups
Now that we’ve explored the ingredients, it’s time to dive into the preparation process. Making Berry Bliss Yogurt Cups is simple and straightforward, allowing you to create a delicious snack in just a few steps.
Preparing the Berry Mixture
The first step in crafting your Berry Bliss Yogurt Cups is to prepare the berry mixture. Begin by measuring out your desired quantity of mixed frozen berries. A typical serving might include about one cup of berries, but feel free to adjust based on your personal preference.
Next, place the mixed berries in a bowl and add your chosen natural sweetener—either honey or maple syrup. Gently toss the berries to ensure they are evenly coated with the sweetener. This step is crucial, as it will enhance the flavor of the berries and create a luscious syrup that will blend beautifully with the yogurt.
Once mixed, let the berries sit for about 10-15 minutes. This resting period allows the berries to thaw slightly and for the sweetener to draw out their natural juices, resulting in a more flavorful berry mixture. As the berries sit, they will become succulent and syrupy, providing a delicious contrast to the creamy yogurt.
Stay tuned for the next section, where we will continue with the steps to assemble your Berry Bliss Yogurt Cups and explore additional tips to customize your creation!

Mixing the Yogurt Base
To start your Berry Bliss Yogurt Cups, the first step is to create a delicious yogurt base. You’ll want to use high-quality yogurt as the foundation for your cups. Greek yogurt is an excellent choice due to its thick consistency and protein content, but you can also opt for regular yogurt or plant-based alternatives if you prefer a dairy-free option.
Tips for Achieving the Perfect Yogurt Consistency
1. Choose the Right Yogurt: Select yogurt that suits your dietary needs and taste preferences. For a creamier texture, stick with full-fat options. If you’re looking for something lighter, consider low-fat or non-fat varieties.
2. Whip It Up: For an airy texture, whisk the yogurt vigorously. This can help incorporate air and make the yogurt lighter. If you want a smoother consistency, use a blender until creamy.
3. Add Flavor: To enhance the flavor of your yogurt, consider mixing in a splash of vanilla extract or a sprinkle of cinnamon. These additions can elevate the taste profile without overpowering the natural flavors of the berries.
Suggestions for Adjusting Sweetness Based on Personal Preference
Sweetness levels can be adjusted based on your taste. If you prefer a sweeter yogurt, add honey, maple syrup, or agave nectar. Start with a small amount, about one tablespoon, and mix thoroughly. Taste the yogurt and adjust as needed, keeping in mind that the berries you’ll add later also contribute natural sweetness. For a healthier option, consider using ripe bananas or applesauce as natural sweeteners, which can add flavor and creaminess without refined sugars.
Layering the Cups
Once your yogurt base is ready, it’s time to layer the cups. Layering adds both visual appeal and a delightful mix of flavors in each bite.
Techniques for Creating Visually Appealing Layers
1. Use Clear Cups: For maximum visual impact, choose clear cups or jars to showcase the beautiful colors of the yogurt and berries. This will entice your guests and make the dessert more appealing.
2. Layering Order: Start with a layer of yogurt at the bottom, followed by a layer of mixed berries. Alternate between yogurt and berries, finishing with a yogurt layer on top. This method helps create a stunning visual effect while ensuring every bite has a mix of flavors.
3. Keep It Neat: Use a spoon to carefully scoop out the yogurt and berries, ensuring that you don’t disturb the layers. A piping bag can also be used for yogurt to achieve clean, even layers.
Importance of Portion Control in Layer Sizes
Being mindful of portion control is crucial for creating balanced servings. Aim for about 1/4 cup of yogurt per layer and a similar amount for berries. This balance not only keeps the dessert visually appealing but also ensures that each cup contains a satisfying amount of yogurt and fruit. It’s also a great way to control calorie intake, making it a healthy snack option.
Adding Toppings
The final touch for your Berry Bliss Yogurt Cups is the toppings. This is where you can really customize each cup to suit your tastes.
Ideas for Customizing Toppings Based on Personal Taste
1. Crunchy Textures: Add granola for a satisfying crunch. Choose your favorite store-bought variety or make your own at home for a healthier option.
2. Nutty Goodness: Sprinkle some chopped nuts, such as almonds, walnuts, or pecans, to add a rich flavor and extra nutrients.
3. Seeds: Chia seeds, flaxseeds, or pumpkin seeds can enhance the nutritional profile of your yogurt cups while providing a delightful crunch.
4. Coconut Flakes: Unsweetened coconut flakes can add a tropical twist and a chewy texture that complements the creaminess of the yogurt.
Freezing Process
After layering and topping your yogurt cups, it’s time for the freezing process.
Guidance on How to Freeze Yogurt Cups Properly for Optimal Texture
1. Cover Securely: Use plastic wrap or a lid to cover each cup tightly. This prevents ice crystals from forming and helps maintain the creamy texture.
2. Even Placement: Place the cups in the freezer on a flat surface. Ensure they are spaced apart to allow for even freezing.
3. Freezing Time: Allow the yogurt cups to freeze for at least 4-6 hours, or until fully set. For best results, leave them overnight.
Discussion on the Importance of Patience During the Freezing Phase
Freezing requires patience, as rushing this step can lead to a less-than-ideal texture. If the yogurt cups aren’t frozen long enough, they may not achieve the perfect creamy consistency you desire. On the other hand, leaving them for too long can make them rock-hard and difficult to enjoy. A good rule of thumb is to check the cups after the initial freezing period and adjust the time as needed.
Serving Suggestions
Now that your Berry Bliss Yogurt Cups are beautifully layered and frozen, it’s time to serve them!
Creative Ways to Present Berry Bliss Yogurt Cups
1. Garnish: Enhance the presentation of your yogurt cups by garnishing with fresh mint leaves or edible flowers. This adds a pop of color and an aromatic element to your dish.
2. Serve in Style: Consider using small mason jars or elegant dessert glasses to serve your yogurt cups. This adds a rustic or refined touch, depending on your theme.
3. Accompaniments: Pair the yogurt cups with a side of fresh fruit or a light smoothie for a refreshing breakfast or snack option.
Ideas for Garnishing with Mint Leaves and Other Herbs
Mint leaves not only add a fresh flavor but also create an inviting presentation. Other herbs like basil or lavender can also be used, depending on the flavor profile you desire. Experiment with different herbs to find the perfect match for your yogurt cups.
Suggestions for Pairing with Other Foods
1. Smoothies: Serve your yogurt cups alongside a refreshing smoothie. This combo makes for a well-rounded breakfast or snack.
2. Breakfast Bowls: Incorporate the cups into a breakfast bowl with oats or quinoa for a satisfying meal.
3. Desserts: These yogurt cups can also stand alone as a dessert option, making them perfect for parties or gatherings.
Ideal Occasions for Serving These Yogurt Cups
Berry Bliss Yogurt Cups are versatile and can be served on various occasions, such as:
– Breakfast: Start the day with a nutritious and delightful breakfast.
– Snacks: Perfect for a healthy snack between meals.
– Parties: A great addition to brunch or dessert tables at parties.
– Meal Prep: Make a batch at the beginning of the week for easy grab-and-go snacks.
Storing and Enjoying Leftovers
If you have any leftover yogurt cups, proper storage is key to maintaining their freshness.
Best Practices for Storing Leftover Yogurt Cups
1. Refrigeration: If you plan to eat them within a few days, store the cups in the refrigerator. Cover them tightly to prevent any odors from the fridge affecting the flavor.
2. Freezing Leftovers: If you have more cups than you can consume, they can also be refrozen. Just ensure they are tightly covered to prevent freezer burn.
Tips on How Long the Yogurt Cups Can Be Stored in the Freezer Without Compromising Quality
When stored properly, frozen yogurt cups can last up to 2-3 months in the freezer. However, for the best quality and flavor, try to consume them within a month. After this point, the texture and taste may start to decline, so be sure to label your cups with the date they were frozen.
Conclusion
In summary, Berry Bliss Yogurt Cups are not only simple to make but also packed with health benefits. With fresh berries, creamy yogurt, and customizable toppings, they make for a nutritious snack or dessert that the whole family can enjoy.
Experimenting with different ingredients and flavors fosters creativity in the kitchen, allowing you to tailor your yogurt cups to your liking. The joy of creating healthy snacks at home is truly rewarding, especially when shared with family and friends. So gather your ingredients, mix up your yogurt base, and start layering for a delightful treat that everyone will love. Enjoy your Berry Bliss Yogurt Cups today!
